Computer Science 3710: Computer Graphics
Professor: Dr. Stephan Wismath
![]()
2006 Project
By Casey Leonard
![]()
Computer Science 3710: Computer Graphics
Professor: Dr. Stephan Wismath
![]()
2006 Project
By Casey Leonard
![]()
Here is my final result:
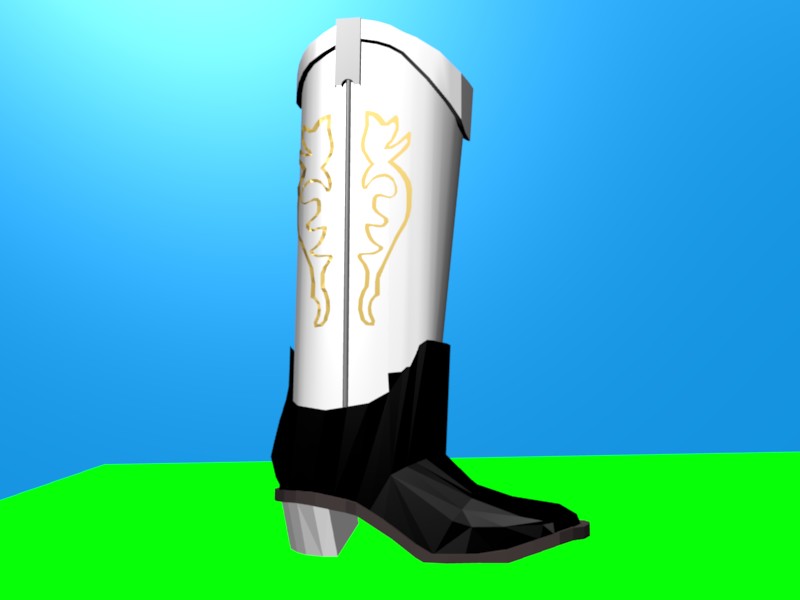
The hardest part of this project was probably choosing what I was going to model. In the end, I chose to model a large "statue" of a cowboy boot that is located outside a store in Edmonton. After first trying out PovRAY, the software I chose to use for modelling was Blender. This allowed me to visually manipulate my objects, rather than using pov code. It also provided me with more flexibility to modify. As I had no previous experience with Blender or any other image rendering software, everything involved with this project was new to me. The learning curve seemed a bit steep at first; however, once I got the feel for the software it was much better.
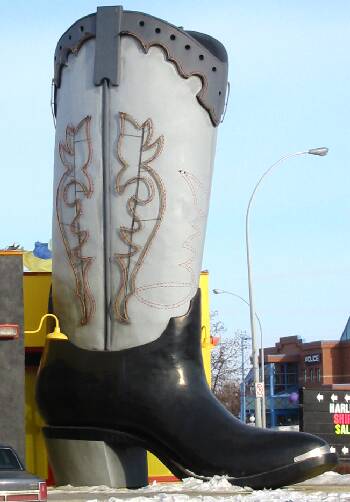
Here is an image I found online of the boot. I based all of my modelling on it.:
I began this project by completing a lot of tutorials that I found online. These included everything from working with the interface to modelling a human head. The Blender interface took a while to master, but it works quite well once you catch on and really aids in design. I did a lot of tutorials to learn about the various ways I could manipulate meshes in order to achieve the desired result.
To create this model, I began with a cube mesh which I resized to match the boot neck of the above image. From there I subdivided where necessary and moved vertices around to create the basic shape with the curved top. I simultaneously edited both sides of the boot to make sure it was symmetrical. I tried to minimize the number of subdivisions I did, as they made everything more difficult to work with.
Once the neck of the boot was done, I extruded the bottom faces and performed more moves and subdivisions to create the foot and toe. To round of the edges, I used the 'bevel' tool.
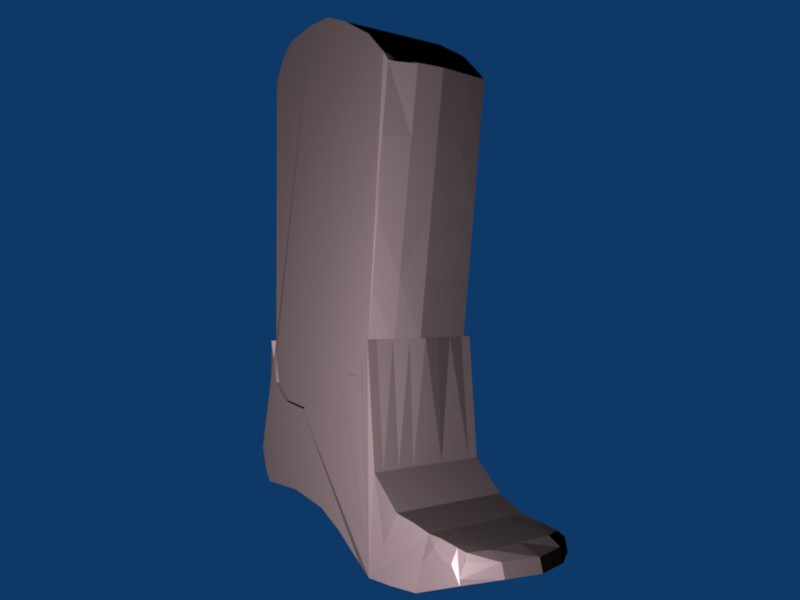
The most difficult part of the modelling was trying to round out the boot. This is also where I spent a good deal of my time working with the fine details. The problem was that because I began with a cube mesh, the boot was very square looking:
I decided to deal with the problem by first spliting the boot object into two sections; the neck and the foot. This had to be done eventually anyways so that I could apply the separate textures. To do the rounding, I did a lot of subdividing, moving and recreation of faces, edges, and vertices. I did the foot section first, and it shows. By the time I got to the neck I had become much more comfortable with the process and the result is much better.
Here is a progress picture of the foot section:

The sole of the shoe was simple. I created a circle mesh, scaled it to the correct size, placed it beneath the foot section, and again manually adjusted the shape. From there all I had to do was extrude it down. The heel was then a simple extrusion and slight down scale of the rear section of the sole.
The design on the neck of the boot was a pain in the butt. I made it out of a circle mesh.
In the end, I am happy with the result, although I would have liked to add the surrounding buildings to the image. It would have been nice to create a more rounded foot section as well.
From this doing this project, I learned the basic and intermediate levels of the Blender software package. I also learned that when working with graphics software, you are never really done. There is always more that you could do given the time, the knowledge, and the desire.