The Eye Of Ludor
Created/Written By Henry Chung for Computer Science 3710 - Computer Graphics - Spring 2007 Semester.

The Final Image. Please click it to enlarge. Took 15 minutes and 46 seconds to render the image.
Created using POV-Ray (Photon-Oriented Violet Ray...I mean Persistence Of Vision Raytracer!)
Final Image: 272 KB - Rendered using 1024x768 resolution with Anti-Aliasing at 0.3.
If the image is too bright, it is because my computer screen is configured to be very dark. Please click here and see what I see, hopefully...!
|

The image before the Fog Effect was applied.
The fog reduced the eye's brightness.
If the image is too bright, it is because my computer screen is configured to be very dark.
Please click here and see what I see, hopefully...! |
There
lies a
tainted land,
Within the area of Lethbridge on the
western side.
The desire for other's failures and
pains,
This vile creature resides.
It
sees everything,
Plunging the students of this land
in constant fear.
Not a single soul who values their
mind and soul,
Dares to go near.
The
Eye of Ludor,
Was brought here by one man.
Who else could be more despicable,
Than the one who oversees that the
University properly ran.
Ah
yes, the Eye
was a spying and
punishing tool,
Catching all those who disobeyed the
University's rules.
Then it devours all of its victims
confidence and joy,
And mocks the blundering fools.
It
mentally
injects words,
Hazardous to those feeling down.
Attempts to push them over the edge,
And within their misery, they drown.
Once
the mind is
lost in
hopelessness and doubt,
Extracting the soul is merely a
simple task.
Leaving your body alive,
But your face expressionless much
like a mask.
You
cannot see the
Eye of Ludor,
But you can feel that it's there.
Constantly taunting you make a great
mistake,
Giving all an uneasy feeling with
its gleeful stare.
|

The University of Lethbridge Hill Structure.
Was taken by myself and served as a reference/guideline. |
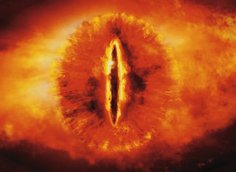
The Eye of Sauron. From the The Lord of the Rings Trilogy.
Served as a reference/guideline.
From: http://en.wikipedia.org/wiki/Image:Eyeofsauron.jpg#file |
The
Eye of Ludor - Description
The Eye of Ludor was inspired by The Lord of the Rings by J. R. R.
Tolkien, as well as the structure at The University of Lethbridge,
the one on the hill just right outside of the University Library.
Within The Lord of the Rings, there lies a land called Mordor, which
is home of the Eye of Sauron; the dark lord within the story set out
to plunge the land in darkness. The name Ludor is simply the first
letters of “Lethbridge University”, followed by the
last
three letters of "Mordor".
The structure which holds the eye was created by taking a box, then
using the difference command and other boxes and
cylinders,
the structure was created. In order to create the grainy texture of
the stone, crand was used within the finish
block. This part probably took the least time to do, except for that I
had
to spend hours playing with the perspectives and getting all the
coordinates straight. That has been my primary problem within this
entire project. Orthographic perspective may of served me
better, but I discovered that too late into the project and was not
planning to change everything around just for it.
Next up was the eye. The eye consists of four spheres. Since
POV-Ray doesn't seem to have a way to have smaller objects show up
within a bigger object and not the bigger object just eat it up, I
had to use a lot of difference commands in order to
make that
happen. Then, the textures also messed me up as I needed
transparency and also the gradients weren't showing up as I wanted
them to. All this together probably took the most time. It
was later solved by using Media and the ever so useful Hollow command.
Hollow
just made the interior of the sphere hollow and the pigment Clear made it so no
solid colour was covering the entire sphere thus not giving us a chance
to see the interior. Interior_Texture
was used. It basically applies pigments and other stuff which
should be on the surface of the sphere or object and makes it seems
like it's behind all the stuff going on within the object's interior.
That was very useful indeed!
After the eye was completed, the sky wasn't too challenging,
especially with the sky_sphere object and plenty of
tutorials
on the Internet as well as the POV-Ray manual. However, one thing to
note about the sky: it uses the skies.inc library included within the
POV-Ray distribution. It is S_Cloud3. I happily modified the
nice blue colours into a dark, evil colour. I'm not insane,
just out of my mind! The floor is just a really big sphere
(and I mean big!) and it took a difference with a
box in order to cut off an area in which the structure could sit on.
Then, textures and turbulence was added to it, as well as
other things.
The
tree was created by
POV-Tree, a program which uses the TOMTREE library in order to create
trees. All three trees are the same trees, just scaled and
positioned differently. The fog just added a nice atmospheric
effect, though it kind of dulled the brightness of the eye. But it
still looked wicked nonetheless!
The Eye of References
Without
these helpful sources, I don't believe that I could of gotten this
done, so thank you! Just note that most of these sources just
had their source codes (if there were source codes) analyzed so I could
learn more about how to do it. One of the biggest things I
looked for was for how the texture within the objects were done, as
well as how the media layer worked.
- The
POV-Ray Manual was a central source of help during the dark times.
The Media, Sky_Sphere, Basic Operations, Atmospheric Effects
(such as fog), you name 'em!
- The
main source of where I learned most of this stuff was not really from
the manual though. The
Online POV-Ray Tutorial was where I started.
Without it, it would be just one headache after another!
Most of the code for this project was written by analyzing
the code found on this site, then flip it upside down (because that's
how I do things!) in order to fit my twisted needs/ideas...!
- The
Friedrich
A. Lohmueller POV-Ray site helped me out a lot too, yet I
didn't really take anything of major significance from this site.
I did however analyze certain bits of code and tried to
understand how it worked. Also, the texture of the ground was
a modified version of his types of grounds found on his images.
- POV-Tree
was the program I used in order to create the Trees. Only
really needed it for one tree, and the rest was done by scaling and
translating the original Tree. POV-Tree uses the TOMTREE
rendering engine, which created generated the Tree and fired up my
rendering time from a couple of seconds all the way to seven-ish
minutes...! But it was worth it!
- Where
would we be without the famous Wikipedia?! The Eye of
Sauron's image was found on there. One look at that
and you can clearly tell that I messed up big time trying to model that
thing! But hey, at least something else just as good popped
up!
- This
page explained to me more about transparency.
- Media
and Particle Systems.
- I
perceived the Eye of Sauron as a ball of fire. Thus, this
page helped me out a lot. The eye's transparency was greatly
affected by this. Flame-Thrower/Fire-Jet
by H. E. Day.
The poem, images,
backgrounds, web page was created by Henry Chung.
The Background and image resizing was done in Paint Shop Pro X and the Web Page in OpenOffice.Org 2.0 Writer and NVU 1.0.


